

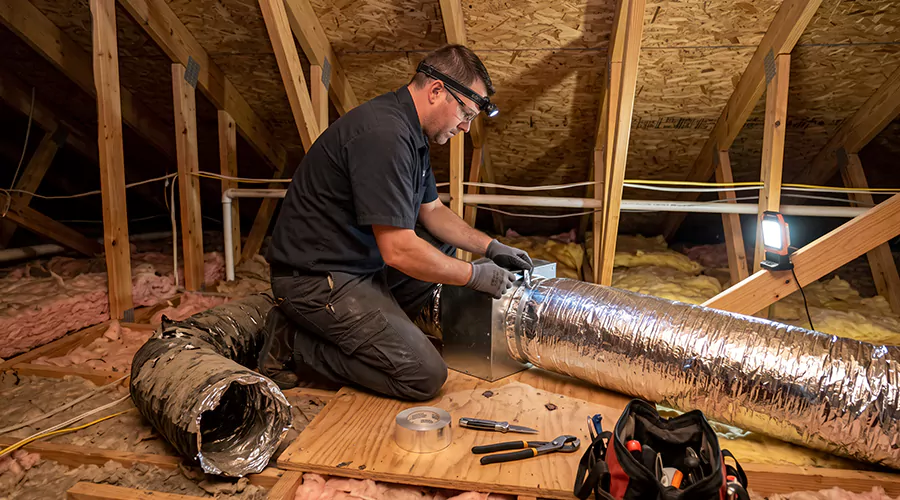
To replace flexible ductwork, first identify the damaged run and confirm the correct duct size. Then remove the old material, install a suitable replacement, secure and seal its connections, and support the new duct without sharp bends or excessive sagging. The completed air duct replacement installation should maintain continuous insulation and be checked for air leakage and proper airflow.
Flexible ductwork is widely used in residential heating and cooling systems because it is lightweight and can follow routes around framing. It commonly connects a rigid supply trunk or junction box to a ceiling or floor register. Although the material can bend, it must be installed carefully to avoid restrictions that reduce the amount of conditioned air reaching a room.
A typical insulated flexible duct contains three layers. The inner liner carries air and is supported by a spiral wire. Fiberglass insulation surrounds the liner, while an exterior jacket helps protect the insulation and limit moisture movement. Each layer has a different role, so replacing the duct requires more than attaching its outer covering to a fitting.
Improper installation can cause significant airflow problems even when the replacement material is new. Long unsupported sections may sag, and sharp bends can compress the inner passage. Secure connections and correct sizing are therefore just as important as the quality of the replacement duct.
When Should You Replace Flexible Ductwork?
Flexible ductwork should be replaced when physical damage prevents it from carrying air properly and a durable repair is not practical. A severely crushed duct is a common example because the inner liner may remain restricted even after the exterior is straightened. Extensive tears and moisture-damaged insulation can also make replacement necessary.
However, not every loose or sagging duct needs to be discarded. A sound flexible branch may simply require improved support or a properly secured connection. Excess duct length can sometimes be removed so the passage follows a more direct route.
The decision should be based on inspection rather than duct age alone. A relatively new branch can fail because of poor installation, while an older properly supported duct may remain suitable. Identifying the defect first prevents unnecessary replacement.
Common Problems That Justify Replacement
A contractor should inspect the full affected branch and its connections before deciding what to replace. Visible damage may be limited to the exterior jacket, or it may extend into the air-carrying liner and insulation. The extent of damage determines the appropriate response.
| Flexible Duct Condition | Recommended Approach |
|---|---|
| Loose connection with sound liner | Reattach and seal |
| Minor sagging with intact material | Improve supports and routing |
| Excessive length causing loops | Shorten and reconnect where appropriate |
| Small outer jacket tear with dry insulation | Repair using compatible materials |
| Permanently crushed inner liner | Replace affected section |
| Extensive liner tearing | Replace affected section |
| Wet or moldy fiberglass insulation | Replace affected material |
| Repeated connection failure from damaged fittings | Repair fittings and replace duct as needed |
| Incorrect duct diameter | Redesign and replace with correct size |
The repair should also address the original cause. For example, replacing a duct without changing inadequate support can allow the new branch to sag in the same location. Moisture problems must be corrected before installing new insulated materials.
What Materials and Tools Are Needed to Replace Flexible Ductwork?
Flexible duct replacement requires the correct duct material and products approved for joining it to the HVAC system. Tools used for cutting and fastening should be suitable for the liner and fittings. A contractor should verify the required materials before removing an existing branch.
| Material or Tool | Purpose |
|---|---|
| Correctly sized insulated flexible duct | Provides replacement airflow passage |
| Approved connection collars | Join flexible duct to existing fittings |
| Mechanical drawbands or specified clamps | Secure inner liner to collar |
| Tensioning tool | Tightens compatible mechanical fasteners |
| UL 181-compatible sealing products | Seal approved duct connections |
| HVAC mastic | Seal suitable duct joints |
| Wide duct support straps or saddles | Prevent sagging and compression |
| Suitable cutting tools | Cut liner, insulation, and reinforcing wire |
| Measuring tape | Confirm duct route and required length |
| Protective gloves and eye protection | Reduce handling injuries |
| Flashlight and inspection equipment | Check fittings and routing |
The insulation rating should meet the requirements of the installation location and applicable local code. Ducts installed in an unconditioned attic or crawlspace generally need more thermal protection than ducts inside conditioned space.
Ordinary cloth-backed duct tape is not a suitable permanent replacement for approved connection and sealing methods. A sound mechanical connection must support the inner liner, while sealing products help prevent air leakage.
How Do You Choose the Correct Flexible Duct Size?
Flexible duct diameter should be determined from the system's airflow requirements. It is not always appropriate to purchase a replacement solely by copying the size of the damaged duct. An existing branch may have been undersized when originally installed.
Residential duct design considers the airflow required by each room, the available blower pressure, and resistance through the duct route. ACCA Manual D provides recognized methods for evaluating these requirements. Long flexible runs and sharp bends increase resistance, so their effect should be considered during design.
A contractor may retain the original diameter when the duct was properly sized and only damaged physically. However, persistent low airflow despite a sound duct suggests that additional diagnosis is necessary. A redesigned route or different size may be more appropriate.
The new duct must also fit the available collar and register boot. A change in diameter may require approved transitions or replacement fittings. The contractor should not force the new liner over an unsuitable connection simply to make it fit.
How to Replace Flexible Ductwork Step by Step?
Replacing flexible ductwork requires careful preparation and a consistent installation sequence. The method below explains how qualified HVAC installers replace a typical insulated flexible branch. Extensive work in attics, crawlspaces, or concealed building cavities should be performed by personnel who can manage the access and airflow-design requirements safely.
Step 1. Inspect the Existing Duct Run
Identify the complete branch, including its connection to the main duct or junction box and the register it serves. Look for crushed sections and damaged insulation. Check whether the duct has excessive length or several sharp bends that may be affecting airflow.
Document the original routing before disassembly. Photographs can help identify the connection points and nearby obstacles. A contractor should also inspect the supporting fittings because a new duct cannot remain secure if its collar is damaged.
The inspection should identify whether only one branch needs replacement or whether damage affects additional ducts. This helps establish the correct scope before materials are ordered.
Step 2. Confirm the Required Diameter and Length
Determine the replacement size from the HVAC design and actual connection requirements. Measure the intended route along the path the new duct will follow. Allow for suitable gentle bends without adding unnecessary loops.
Flexible duct generally performs better when extended close to its intended length. Excessive slack creates additional internal resistance and can cause sagging between supports. Cutting the replacement to a properly planned length helps prevent these problems.
Do not reduce the diameter to pass through a narrow opening unless the new arrangement has been properly designed. An undersized restriction can interfere with the airflow delivered to the room.
Step 3. Check the Work Area for Hazards
Before removing ductwork, evaluate the surrounding attic, crawlspace, or utility area. Look for electrical wiring and unsafe access surfaces. The condition of nearby insulation and any evidence of moisture should also be considered.
Attic ceiling drywall is not designed to support workers. Crawlspaces can contain standing water or exposed electrical hazards. Work should not proceed until safe access is available.
Older buildings may contain materials that require specialized assessment before disturbance. Suspected asbestos-containing insulation should not be cut or removed during ordinary duct replacement.
Step 4. Shut Down the HVAC System
Turn off the heating and cooling equipment before disconnecting a supply or return branch. The system should not operate while duct openings are exposed. This helps prevent loose debris from being drawn into equipment or discharged into occupied rooms.
Qualified personnel should follow appropriate electrical isolation procedures when work takes place near the air handler or furnace. Turning off the thermostat is not sufficient for every equipment-service task.
Ductwork used for distributing room air must also be distinguished from combustion exhaust flues. A fuel-burning furnace vent should never be disconnected as if it were an ordinary flexible supply branch.
Step 5. Remove the Old Flexible Duct
Carefully detach the existing flexible duct from its connection collars. A typical connection includes an inner liner secured to the collar, surrounding insulation, and an exterior jacket. These layers may need to be separated in a controlled sequence during removal.
Support the old duct so its weight does not damage nearby junction boxes or register boots. Do not pull forcefully against a metal collar. A fitting that moves or separates during removal may require repair before the replacement is installed.
Contain loose insulation and debris during the work. Damaged materials should be handled according to their condition and disposed of appropriately.
Step 6. Inspect and Prepare the Collars
Examine the exposed connection collars for looseness, damage, and unsuitable dimensions. A sound collar provides the surface needed for mechanical attachment and sealing. Bent or damaged fittings should be corrected before the replacement duct is connected.
Some flexible duct collars have a raised bead that helps retain the inner liner. Approved mechanical fasteners are then used to secure the connection. The exact method should follow the duct and fitting manufacturers' instructions.
Cleaning the connection surface may be necessary before applying sealant. A damaged or unstable fitting should not simply be covered with additional tape.
Step 7. Position the Replacement Duct
Place the new duct along the planned route without crushing or twisting the liner. The duct should be extended appropriately and directed around obstacles using gradual bends. Avoid forcing it through spaces too narrow for its intended diameter.
The U.S. Department of Energy recommends keeping flexible duct routes as direct as practical. Tight bends and compression can create substantial airflow resistance. A suitable rigid elbow may be preferable when a bend cannot be formed without restricting the flexible passage.
Check the entire route before fastening the ends. Correcting a bend while the duct remains loose is easier than after every connection has been sealed.
Step 8. Prepare the Inner Liner for Connection
At the first connection, carefully move the exterior jacket and insulation back to expose the inner air-carrying liner. The liner should reach the collar without being stretched excessively. It must also remain free from tears and deformation.
Position the inner liner over the appropriate collar as directed by the product manufacturer. The wire-supported passage should maintain its shape at the fitting. An attachment that secures only the exterior jacket does not provide a reliable air connection.
Inspect the liner after positioning it. If the material has been damaged during handling, the affected end should be corrected before the connection is completed.
Step 9. Mechanically Secure and Seal the Inner Liner
Fasten the inner liner to the collar using the approved drawband or mechanical connection specified for the duct. A compatible tensioning tool may be used to tighten the connection. The fastener must be secure without damaging the liner.
Apply approved HVAC mastic or another specified sealing system according to the product instructions. The seal should bridge the connection so conditioned air cannot escape around the collar. Mechanical attachment and airtight sealing perform different functions, so both need attention.
The Department of Energy's Building America guidance describes this sequence for typical insulated flexible duct connections. The exact closure product should be compatible with the duct and applicable standards.
Step 10. Restore the Insulation and Outer Jacket
After the inner liner is secured and sealed, pull the insulation over the connection. It should cover the fitting without large gaps or excessive compression. A gap in insulation can increase unwanted heat transfer and contribute to condensation under certain conditions.
Bring the exterior vapor-barrier jacket over the insulated joint. Secure and seal it using suitable products such as approved foil tape or mastic where specified. The exterior jacket should remain continuous around the connection.
Avoid tightening a narrow strap around the insulation in a way that squeezes the duct. The insulating layer must retain its intended thickness to perform properly.
Step 11. Connect the Other End
Repeat the approved connection procedure at the opposite end of the branch. The new duct should connect securely to its register boot or other designated fitting. Both endpoints must maintain the same attention to mechanical attachment, air sealing, and insulation.
Check that the new duct is not pulled too tightly between connections. Excessive tension can place force on the fittings and cause separation later. At the same time, unnecessary slack should not remain in the run.
Before installing supports, inspect the full route for twisting and sharp bends. The duct should be positioned in its intended final shape.
Step 12. Install Proper Support Straps
Support flexible ductwork using approved straps or saddles attached to suitable building framing. The support should hold the duct without significantly compressing its insulation or inner liner. Narrow wire supports can create restrictions and damage the jacket.
Federal Building America guidance recommends support spacing no greater than four feet for typical horizontal flexible duct installations. Supports should generally be at least 1.5 inches wide, and sag between supports should not exceed approximately half an inch per foot. Manufacturer instructions and applicable codes remain important.
Additional support may be required near fittings or bends. Proper support helps maintain the intended shape and prevents connections from carrying the weight of the entire branch.
Step 13. Inspect the Finished Route
Examine the duct from one end to the other for crushed areas or unnecessary loops. Check each connection and support point. The inner passage should remain open and the exterior insulation should remain continuous.
Pay particular attention to bends near collars. An unsupported flexible duct can develop a sharp turn immediately after leaving a fitting. This is a common source of airflow restriction.
Correct visible problems before restarting the HVAC system. A final route inspection is easier while the installation area remains accessible.
Step 14. Check for Duct Air Leakage
A qualified installer should evaluate the new connections for air leakage. A duct pressure test may be appropriate, particularly when several branches have been replaced. The test can identify defects that are not obvious during visual inspection.
Sealing problems should be corrected before insulation or building finishes make connections difficult to reach. The acceptable leakage level depends on the applicable code or program requirements. The contractor should document results when testing is included in the project.
A newly installed flexible branch should not release conditioned air into an attic or crawlspace. Airtight connections are a basic requirement of the finished work.
Step 15. Verify Room Airflow
After the system is fully connected and restored, operate the equipment according to its instructions. Check the airflow at the register served by the replaced duct. Significant differences from the intended airflow may indicate a sizing or routing problem.
A contractor may measure register airflow and system static pressure where appropriate. This provides more useful information than simply feeling air with a hand. If the room remains uncomfortable, the result should be investigated before the project is accepted.
The completed work should provide a secure and properly supported duct path with suitable airflow. Replacing the damaged material is only part of the installation.
How Do You Connect Flexible Ductwork to Metal Ducts?
Flexible ductwork is commonly connected to rigid metal trunks using an approved takeoff collar. The inner liner must be attached directly to the collar and sealed to prevent leakage. The surrounding insulation and jacket are restored afterward.
A proper connection normally includes mechanical attachment and a compatible sealing product. A drawband or other specified fastener secures the liner, while mastic or an approved closure system seals the joint. The exterior vapor barrier is then sealed to the surrounding material.
A frequent installation problem occurs when only the outer jacket is secured. The air-carrying liner can remain loose underneath, allowing conditioned air to escape. The connection may look finished from outside even though the internal joint is defective.
The installer should inspect the inner liner connection before covering it. This simple check can prevent a hidden leak that would otherwise be difficult to identify.
How Do You Join Two Flexible Duct Sections?
Two flexible duct sections should be joined using an approved rigid connector of the correct diameter. The inner liner of each section is secured to the connector using suitable mechanical fastening and sealing methods. The insulation and exterior jackets are then brought together and sealed.
A proper connector provides a stable surface for both ends. The flexible liners should not simply be overlapped and taped together without an approved fitting. Such a joint may separate under normal airflow or movement.
Splicing also adds a connection that must remain airtight. A single continuous properly sized run may be preferable when practical. The contractor should consider whether a splice is necessary before adding another potential leakage point.
How Far Apart Should Flexible Duct Supports Be?
For typical horizontal installations, Department of Energy guidance recommends supports no more than four feet apart. The supports should generally be at least 1.5 inches wide, and the duct should not sag more than half an inch per foot between them. Specific products or local codes may impose additional requirements.
Wide supports distribute the duct's weight without squeezing the insulation. A narrow wire can concentrate pressure in one area and restrict the passage. The support arrangement should allow the duct to maintain its intended shape.
Additional straps may be needed before and after significant bends. Connection fittings and register boxes should also be independently supported where required. The flexible branch should not pull against its endpoints because of inadequate support.
Can You Use Regular Duct Tape on Flexible Ductwork?
Ordinary cloth-backed duct tape is not a recommended permanent method for securing or sealing HVAC duct connections. Its adhesive may not provide the durability required under installation conditions. Proper connections use specified mechanical fasteners and sealing products suitable for flexible duct materials.
Products identified as compliant with the applicable UL 181 closure requirements may be used where their instructions permit. HVAC mastic is another common sealing material for suitable connections. The installer should verify compatibility rather than rely on the word duct printed on a package.
Tape alone should not support the inner liner mechanically. The connection needs a suitable collar and attachment method. Sealing is performed after the parts are secured.
How Much Does Replacing Flexible Ductwork Cost?
Published 2026 estimates for flexible duct installation and replacement commonly include rates around $10 to $18 per linear foot for some projects. Broader duct replacement estimates can be higher when old duct removal, difficult access, and additional fitting work are involved. An individual run may cost approximately $270 to $500 under general residential replacement estimates.
The cost depends on the length and diameter of the duct and where it is installed. A crawlspace project may require more labor than an accessible branch in an open attic. Changing duct sizes or replacing damaged register boots can also add expense.
A contractor should provide an estimate that includes material, insulation, fastening, sealing, and support. The price should also explain whether airflow or leakage testing is included. Installation quality affects the long-term value of the work.
What Mistakes Should You Avoid When Replacing Flexible Ducts?
Flexible ducts can become restrictive because of installation errors even when the material remains undamaged. Improper support and poorly sealed connections are common problems. These conditions may reduce room airflow or cause energy losses.
Avoid these mistakes:
- Selecting duct diameter without considering airflow requirements.
- Leaving excessive unused duct length in the run.
- Forcing flexible duct through an undersized opening.
- Creating sharp bends immediately after a collar.
- Attaching only the outer jacket instead of the inner liner.
- Relying on ordinary cloth-backed tape for connections.
- Leaving the inner connection unsealed.
- Compressing insulation under narrow support straps.
- Allowing long unsupported sections to sag.
- Leaving gaps in the exterior vapor barrier.
- Installing new material before correcting water damage.
- Failing to check airflow and leakage afterward.
Each of these problems can interfere with the purpose of the replacement. A new duct should provide a well-supported and airtight passage rather than repeat the defects of the original installation.
Can You Replace Flexible Ductwork Yourself?
A limited repair may be possible for an experienced homeowner when the duct is safely accessible and the connection method is understood. However, significant replacement requires appropriate sizing, installation materials, and performance checks. The work should comply with local building requirements and manufacturer instructions.
Attics and crawlspaces can contain serious hazards unrelated to the HVAC system. These include electrical wiring, unstable walking surfaces, excessive heat, and moisture. Old insulation may also require assessment before disturbance.
For multiple branches or complicated duct routing, a qualified HVAC installer is usually the better choice. A professional can evaluate airflow requirements and test the completed connections. This helps prevent an inexpensive material replacement from creating more expensive performance problems.
How Can You Prevent Flexible Duct Damage After Replacement?
Protect flexible ducts from heavy objects and unnecessary movement. Stored items should not rest on exposed attic branches, and crawlspace ducts should be kept supported away from standing water. Movement around the ducts should be limited to avoid tearing the jacket.
Inspect accessible supports periodically during HVAC maintenance. A broken strap may allow a section to sag and develop a sharp bend. Repairing the support early may prevent the need for another duct replacement.
Keep insulation and vapor-barrier coverings intact. If moisture repeatedly reaches the duct, investigate the source before the material deteriorates. Proper support and protection help maintain airflow over time.
Conclusion
Replacing flexible ductwork requires correct sizing, careful removal of damaged material, and proper installation of the new duct. The inner liner must be mechanically secured and sealed at both ends, while the insulation and exterior jacket need to remain continuous. Wide support straps and gentle bends help prevent airflow restrictions. Testing confirms whether the new duct performs as intended. Before starting a replacement project, identify the damage and determine whether the existing system also needs a design correction.